
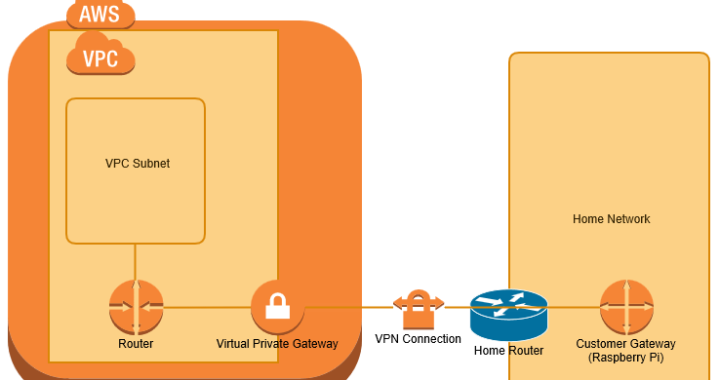
Network Diagram

Configuring VPC
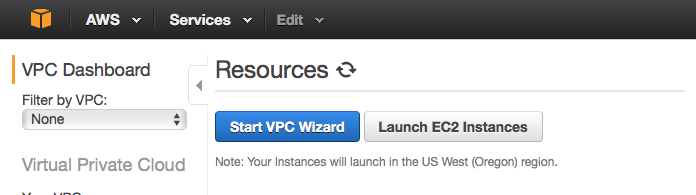
Login to AWS, and select Services->VPC, this takes you to the VPC dashboard. Start the VPC Wizard
Choose VPC with a Private Subnet Only and Hardware VPN access and click Select.


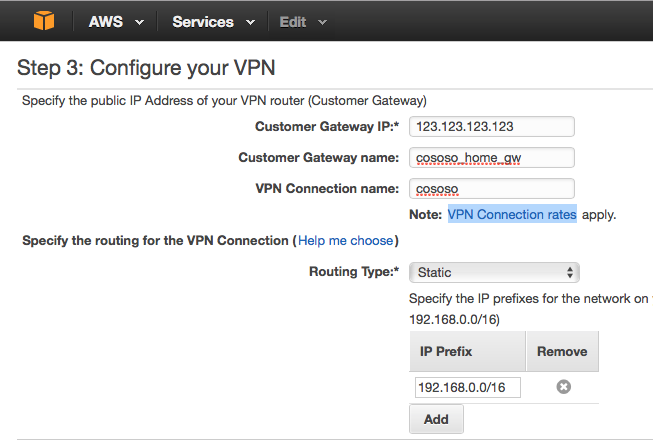
Wait for the VPN to be created

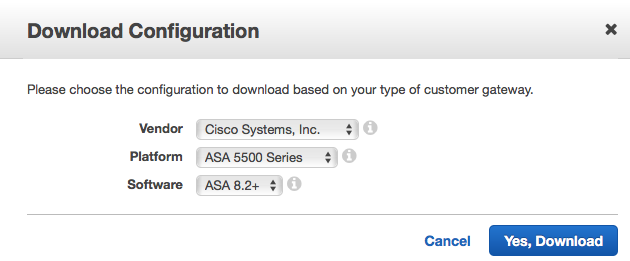
Now on the left towards the bottom find the VPN Connections page and click the Download Configuration button at the top of the page
In the downloaded configuration file find the tunnel groups under the IKE section
!
! The tunnel group sets the Pre Shared Key used to authenticate the
! tunnel endpoints.
!
tunnel-group <TUNNEL1_IP> type ipsec-l2l
tunnel-group <TUNNEL1_IP> ipsec-attributes
 pre-shared-key <PSKEY_STRING>
You will need the <TUNNEL1_IP> and <PSKEY_STRING> values later, note them down.
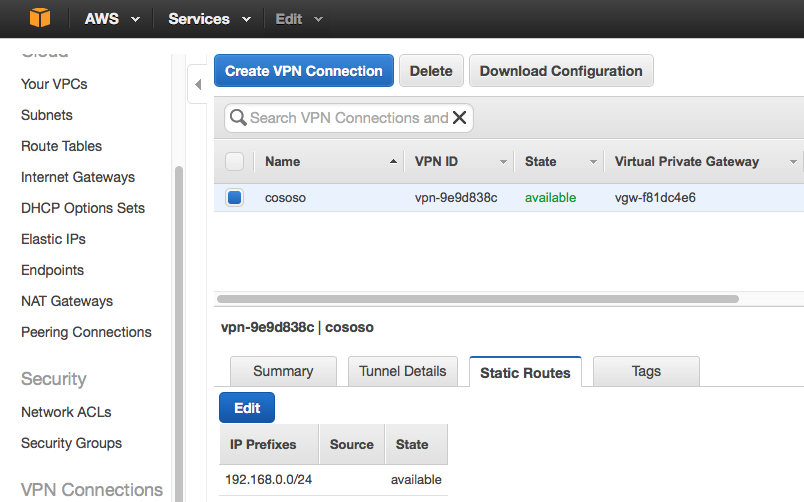
Ensure that the static route to your home network exists in the VPN, Opne VPN Connections and select the Static Routes tab, it should show the CIDR for your home network. If not (my setup didn't) click Edit and type in the CIDR.
Configure the Raspberry Pi
Enable the Random Number Generator
Edit /boot/config.txt and append
# Enable random number generator
dtparam=random=on
Reboot and then install the random number generator tools
sudo apt-get install rng-tools
Install Openswan
sudo apt-get install -y openswan lsof
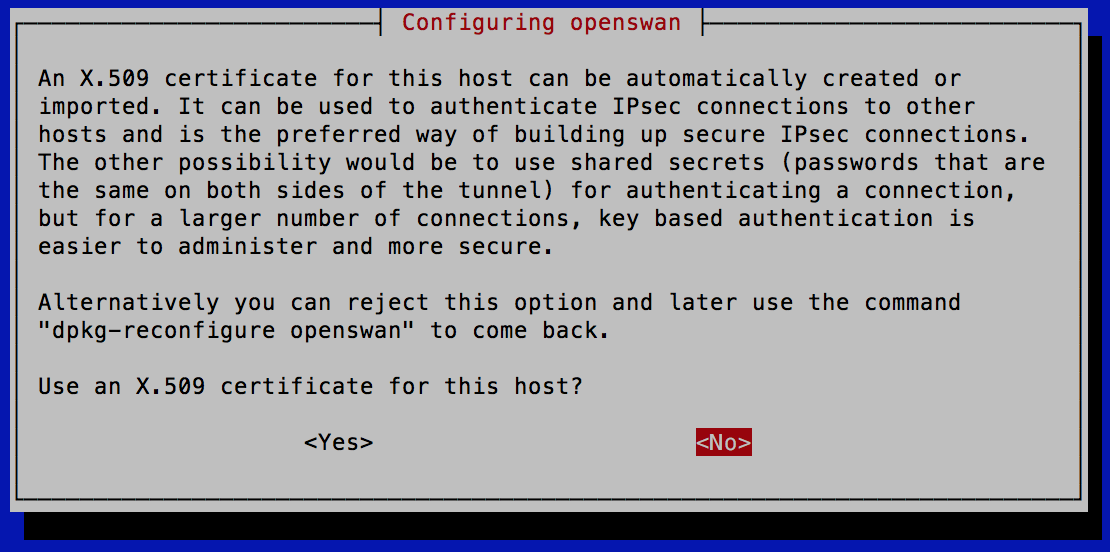
During package installation you get prompted about using X.509 certificates. I'm sure AWS supports these, for now I'm skipping for simplicity.
IPSec configuration
Edit /etc/ipsec.conf and set the content as shown below. NOTE this is including configuration files from /etc/ipsec.c/*.conf, this allows different files for different connections.
# /etc/ipsec.conf - Openswan IPsec configuration file
#
# Manual: ipsec.conf.5
#
# Please place your own config files in /etc/ipsec.d/ ending in .conf

version 2.0 # conforms to second version of ipsec.conf specification

# basic configuration
config setup
 # Debug-logging controls: "none" for (almost) none, "all" for lots.
 # klipsdebug=none
 # plutodebug="control parsing"
 # For Red Hat Enterprise Linux and Fedora, leave protostack=netkey
 protostack=netkey
 nat_traversal=yes
 virtual_private=
 oe=off
 # Enable this if you see "failed to find any available worker"
 # nhelpers=0

#You may put your configuration (.conf) file in the "/etc/ipsec.d/" and uncomment this.
include /etc/ipsec.d/*.conf
Create a configuration file for this connection, edit /etc/ipsec.d/home_to_aws.conf
conn home-to-aws
   type=tunnel
   authby=secret
   #left=%defaultroute
   left=192.168.0.30
   leftid=123.123.123.123
   leftnexthop=%defaultroute
   leftsubnet=192.168.0.0/24
   right=<TUNNEL1_IP>
   rightsubnet=10.0.0.0/16
   pfs=yes
   auto=start
Where
left - The IP address of your Raspberry Pi on your home network
leftid - The IP address of your home gateway
leftsubnet - the CIDR of your home network
right - the IP address of Tunnel1 in your AWS gateway.
right subnet - The CIDR of your VPC
Input the pre-shared key
edit/var/lib/openswan/ipsec.secrets.inc and set the content as below
123.123.123.123 <TUNNEL1_IP> : PSK "<PSKEY_STRING>"
Edit /etc/sysctl.conf
Append the following lines
net.ipv4.ip_forward=1
net.ipv4.conf.all.accept_redirects = 0
net.ipv4.conf.all.send_redirects = 0
net.ipv4.conf.default.send_redirects = 0
net.ipv4.conf.default.accept_redirects = 0
Then run sysctl -p to reload it.
Check IPSec status
$ sudo ipsec verify
Checking your system to see if IPsec got installed and started correctly:
Version check and ipsec on-path [OK]
Linux Openswan U2.6.38/K4.4.11-v7+ (netkey)
Checking for IPsec support in kernel [OK]
 SAref kernel support [N/A]
 NETKEY: Testing XFRM related proc values [OK]
 [OK]
 [OK]
Hardware RNG detected, testing if used properly [OK]
Checking that pluto is running [OK]
 Pluto listening for IKE on udp 500 [OK]
 Pluto listening for NAT-T on udp 4500 [OK]
Checking for 'ip' command [OK]
Checking /bin/sh is not /bin/dash [WARNING]
Checking for 'iptables' command [OK]
Opportunistic Encryption Support [DISABLED]
Restart IPSec
sudo service ipsec restart
Check IPsec status
make sure an active connection is running
$ sudo service ipsec status
● ipsec.service - LSB: Start Openswan IPsec at boot time
 Loaded: loaded (/etc/init.d/ipsec)
 Active: active (running) since Mon 2016-07-11 17:56:40 UTC; 8min ago
 Process: 1660 ExecStop=/etc/init.d/ipsec stop (code=exited, status=0/SUCCESS)
 Process: 1746 ExecStart=/etc/init.d/ipsec start (code=exited, status=0/SUCCESS)
 CGroup: /system.slice/ipsec.service
 ├─1840 /bin/sh /usr/lib/ipsec/_plutorun --debug --uniqueids yes --...
 ├─1841 logger -s -p daemon.error -t ipsec__plutorun
 ├─1842 /bin/sh /usr/lib/ipsec/_plutorun --debug --uniqueids yes --...
 ├─1845 /bin/sh /usr/lib/ipsec/_plutoload --wait no --post
 ├─1846 /usr/lib/ipsec/pluto --nofork --secretsfile /etc/ipsec.secr...
 ├─1853 pluto helper # 0
 ├─1854 pluto helper # 1
 ├─1855 pluto helper # 2
 └─1974 _pluto_adns

Jul 11 17:56:41 vpc pluto[1846]: "home-to-aws" #1: STATE_MAIN_I2: sent MI2,...R2
Jul 11 17:56:41 vpc pluto[1846]: "home-to-aws" #1: NAT-Traversal: Result us...ed
Jul 11 17:56:41 vpc pluto[1846]: "home-to-aws" #1: transition from state ST...I3
Jul 11 17:56:41 vpc pluto[1846]: "home-to-aws" #1: STATE_MAIN_I3: sent MI3,...R3
Jul 11 17:56:41 vpc pluto[1846]: "home-to-aws" #1: Main mode peer ID is ID_...4'
Jul 11 17:56:41 vpc pluto[1846]: "home-to-aws" #1: transition from state ST...I4
Jul 11 17:56:41 vpc pluto[1846]: "home-to-aws" #1: STATE_MAIN_I4: ISAKMP SA...8}
Jul 11 17:56:41 vpc pluto[1846]: "home-to-aws" #2: initiating Quick Mode PS...8}
Jul 11 17:56:42 vpc pluto[1846]: "home-to-aws" #2: transition from state ST...I2
Jul 11 17:56:42 vpc pluto[1846]: "home-to-aws" #2: STATE_QUICK_I2: sent QI2...e}
Hint: Some lines were ellipsized, use -l to show in full.
Start on reboot
sudo update-rc.d ipsec defaults
reboot the Raspberry pi and recheck the ipsec service status
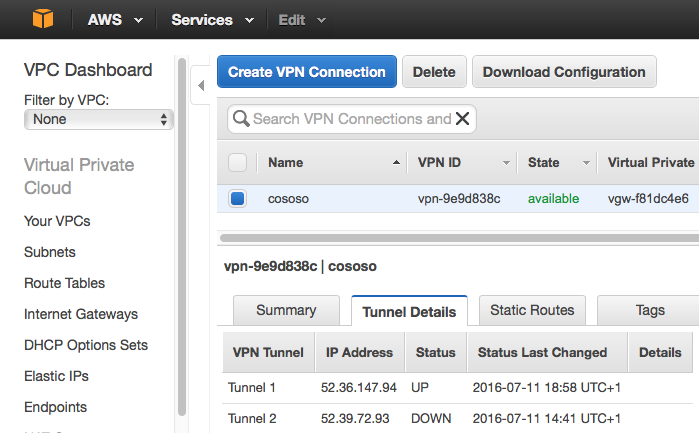
Check VPC connection in the VPC console
Make sure Tunnel1 is UP
Redundancy
For increased reliability, add the second tunnel configuration to the RPI configuration
Create an EC2 Instance
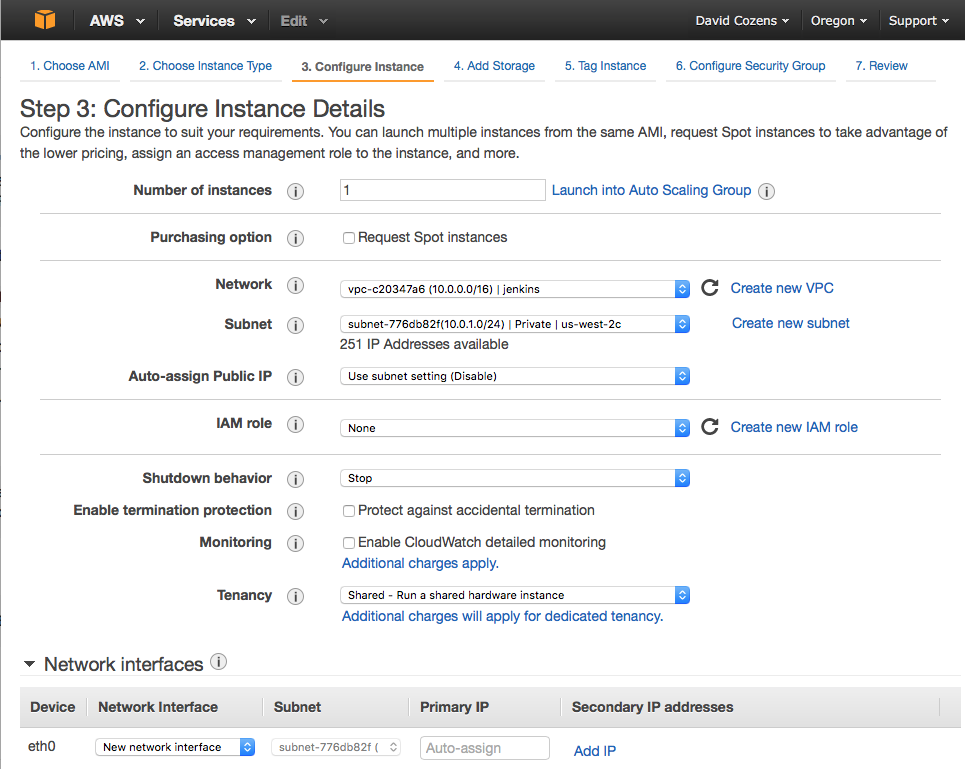
To test the configuration Launch an EC2 instance into your VPC. As an example I'm launching the free tier Ubuntu server.
From the EC2 Dashboard select Launch Instance, select Ubuntu Server 14.04 LTS (HVM), SSD Volume Type, select t2.micro (Free Tier Eligible) then click Next: Configure Instance Details. Select your VPC as the Network.
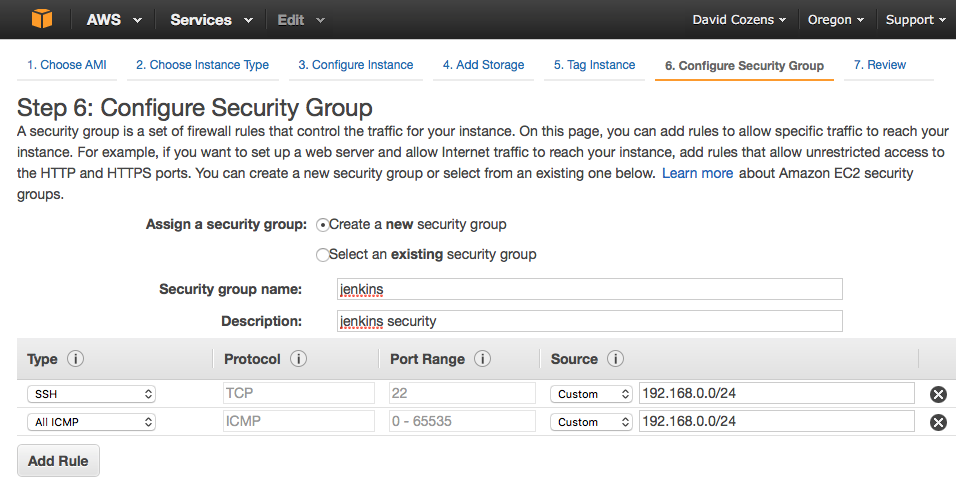
Click Next: Add Storage, Next: Tag Instance, Next: Configure Security Group, Create a new security group and add the rules you require, the example below adds SSH and ICMP (ping) from my home subnet.
Click Review and Launch, Launch, create a new key-pair (or use existing if you prefer), Download the Key Pair and keep them safe. Launch and then View Instance. Wait for the Status Checks to complete.
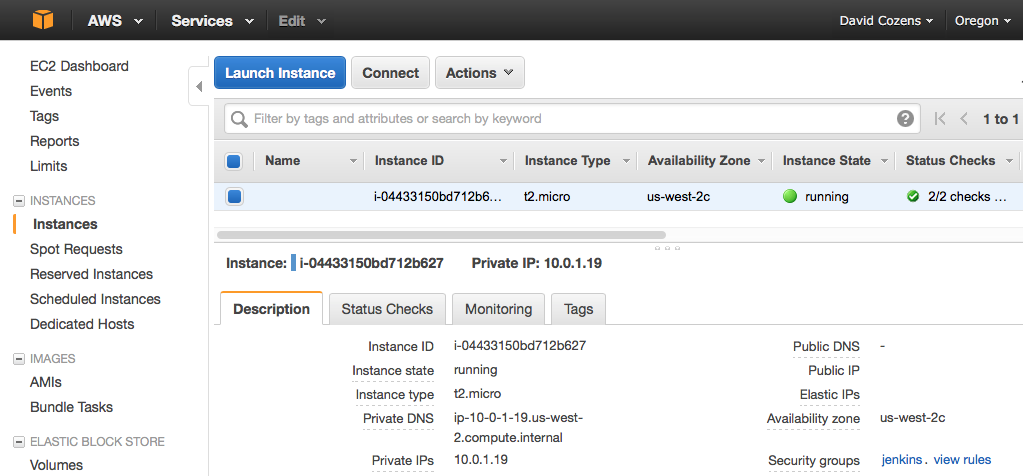
Note the private IP address - in this example 10.0.1.19
From your Raspberry Pi you should now be able to ping the instance
$ ping 10.0.1.19
PING 10.0.1.19 (10.0.1.19) 56(84) bytes of data.
64 bytes from 10.0.1.19: icmp_seq=1 ttl=64 time=200 ms
64 bytes from 10.0.1.19: icmp_seq=2 ttl=64 time=204 ms

Thanks for this. Very useful.
I have spotted a couple of typo’s in your content though:
1. in the Configure the Raspberry Pi / Enable the Random Number Generator section you need to edit /boot/contfig.txt and not /boot/contfig.tx
2. you should append dtparam=random=on rather than dtparam=randon=on
Not too difficult and I’m sure most people have worked it out for themselves but I thought I would provide feedback in case someone was experiencing problems with your guide which otherwise works flawlessly 🙂
Thank you, I’ve corrected the typos. I hope it works well for you.
I had to apply this fix for missing newlines !?!
https://ubuntuforums.org/showthread.php?t=1319791