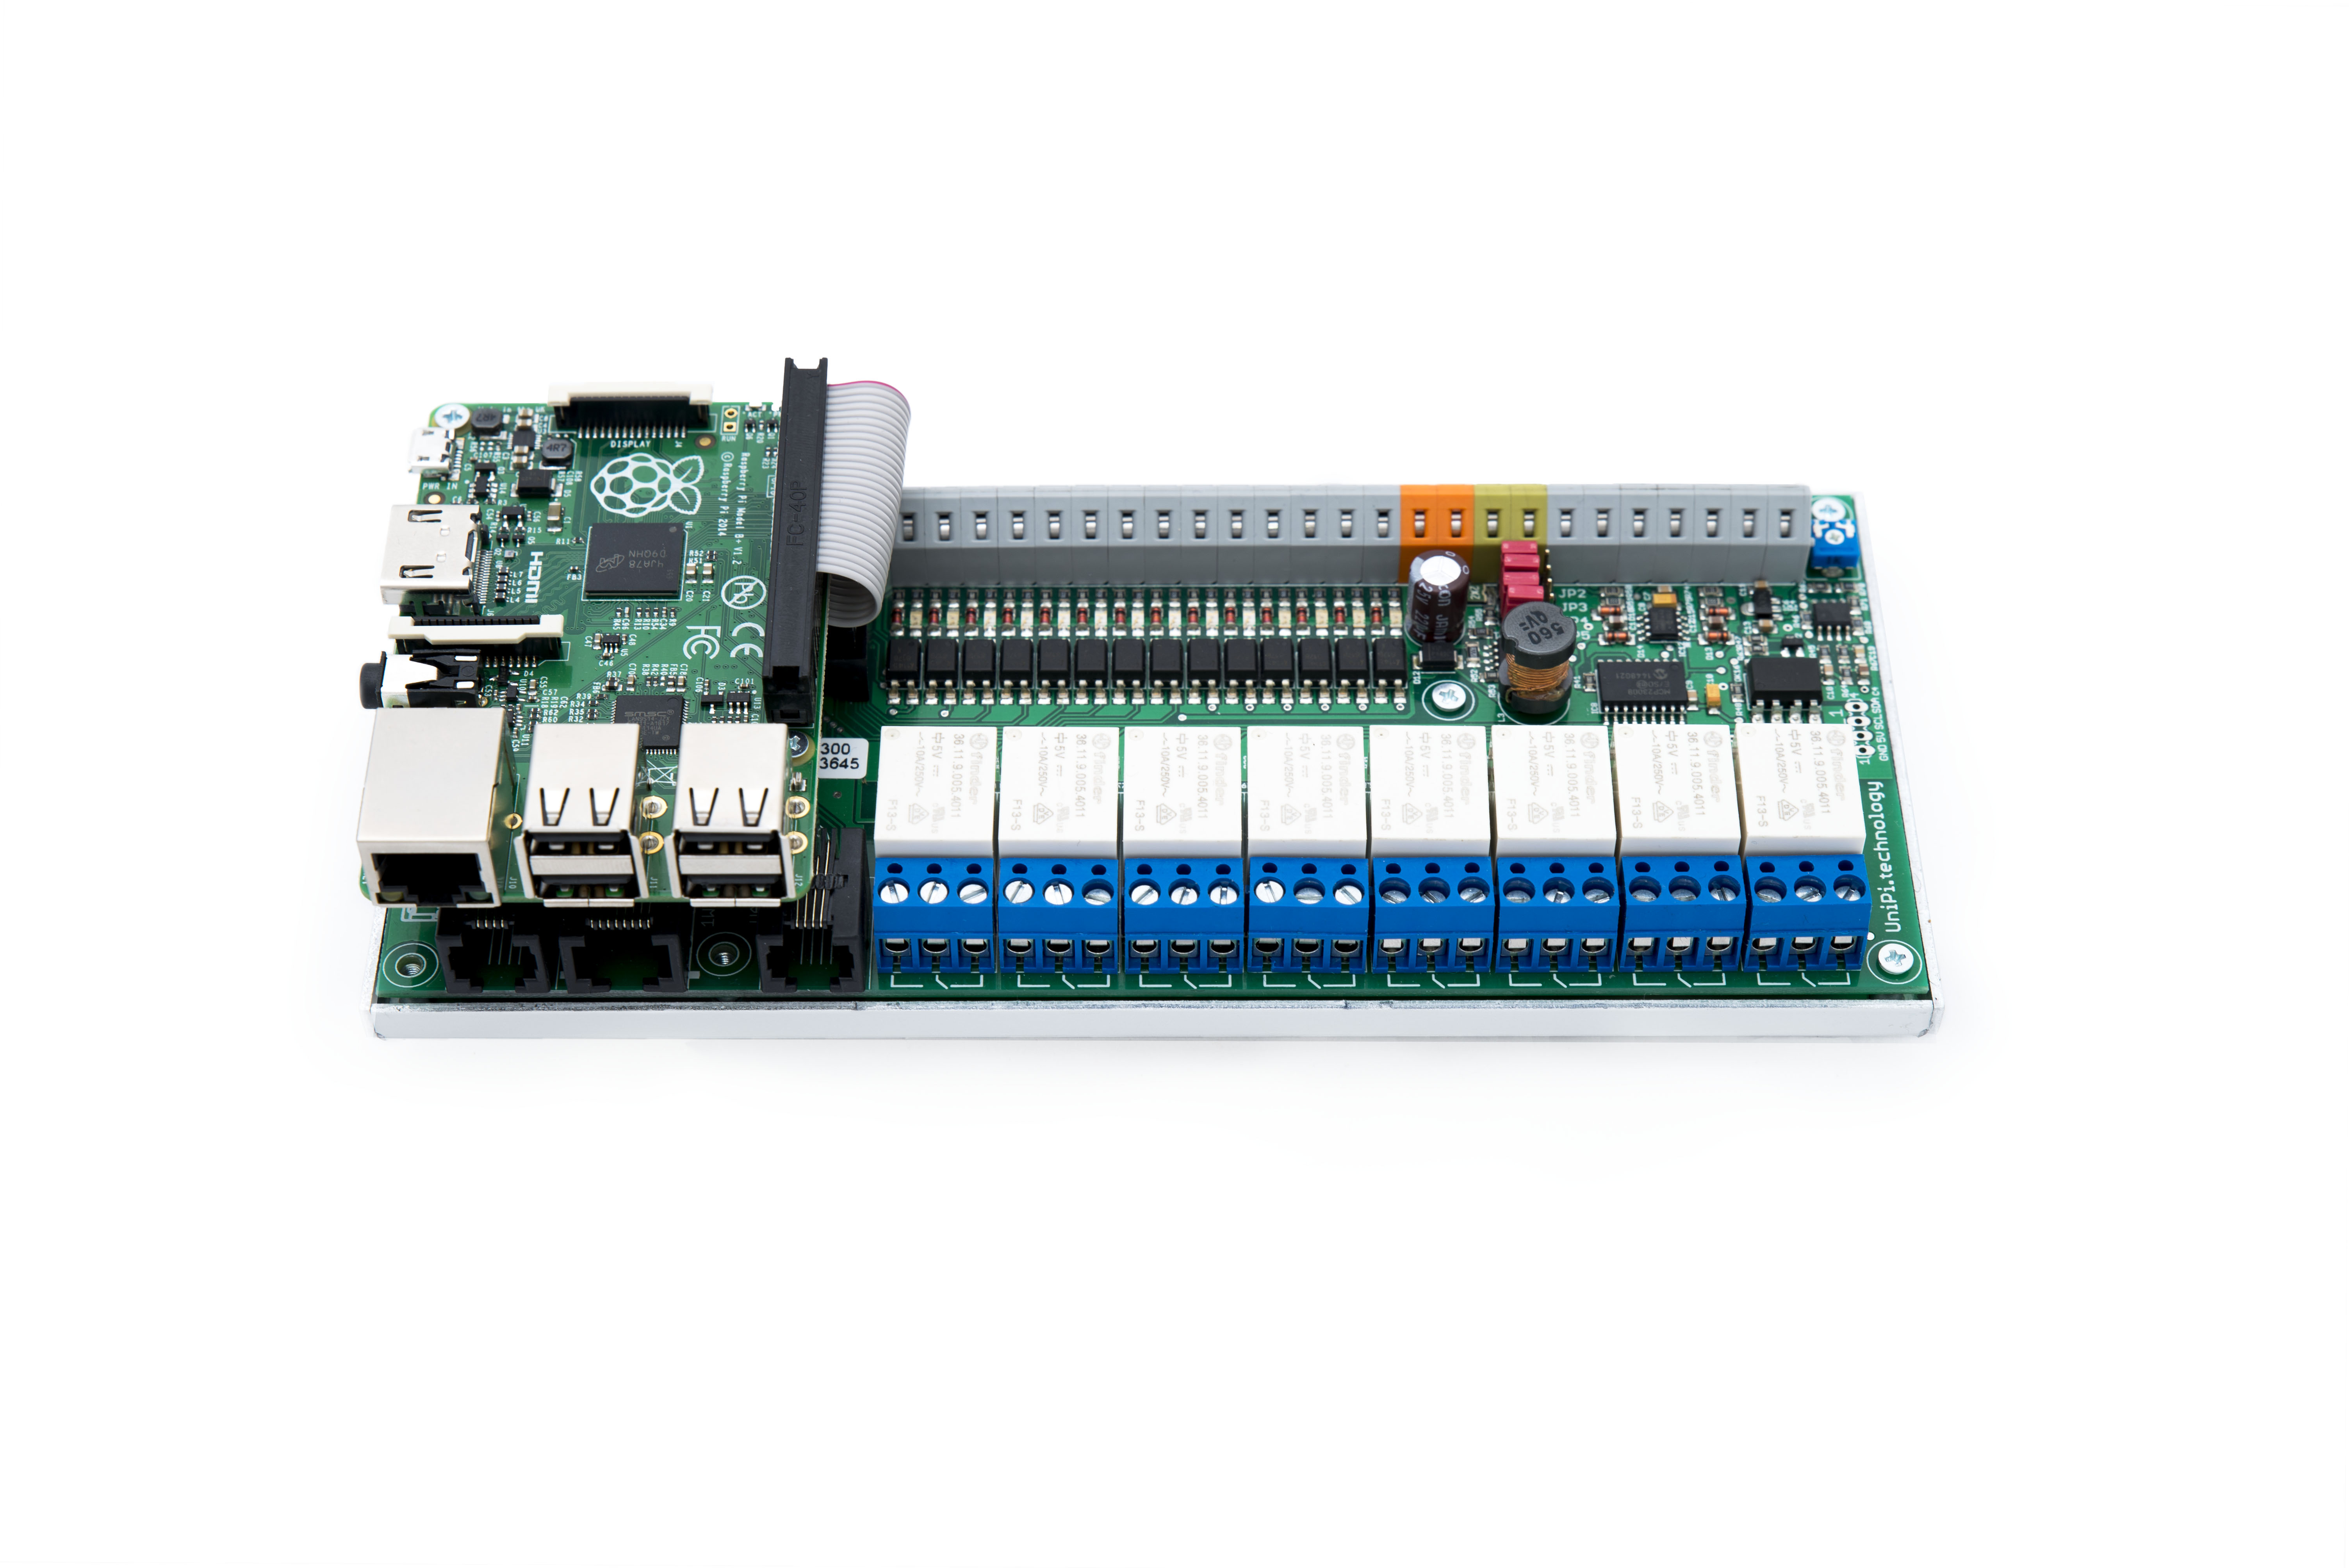
Today I have released CODESYS for UniPi for free download from the CODESYS store. This package adds a comprehensive set of drivers to CODESYS for Raspberry Pi allowing full use of the features of the UniPi Extension board from within CODESYS.
Tag Archives: RaspberryPi
Getting Started with Yocto on the Raspberry Pi
Introduction
I’ve been wanting to have a play with Yocto so decided to have a go at getting an image running on a Raspberry Pi. I found plenty of references but no step by step that just worked. This post just covers my notes on how to get going.
Development Machine
The Yocto Project Quick Start states “In general, if you have the current release minus one of the following distributions, you should have no problems”, then lists several distros including Ubuntu. I originally tried using Ubuntu 16.04, and had problems, I think because of the later version of gcc.
I used a clean install of Ubuntu 14.04 desktop running on a virtual machine, the rest of the process was actually pretty straight forward
Firstly I made sure that Ubuntu was fully patched
sudo apt-get update sudo apt-get upgrade
Then following the Yocto Project Quick Start I installed the required packages
sudo apt-get install gawk wget git-core diffstat unzip texinfo gcc-multilib build-essential chrpath socat libsdl1.2-dev xterm
I then disabled the dash shell in favour of the bash shell ( I did this because I saw it advised, not sure if this is required)
sudo dpkg-reconfigure dash
Getting the code and Building
At the time of writing krogoth is the latest version of Yocto, hence I am working with that branch. The raspberrypi meta data is not currently branched so I am working with the master branch. The first step is to clone yocto and meta-raspberrypi
mkdir yocto cd yocto git clone -b krogoth git://git.yoctoproject.org/poky.git poky cd poky git clone -b master git://git.yoctoproject.org/meta-raspberrypi
Now generate the default configuration files into the default directory build.
. oe-init-build-env build
Now we need to edit the build configuration. Firstly edit yocto/poky/build/conf/local.conf add these lines
MACHINE ?= "raspberrypi2"
GPU_MEM = "16"
MACHINE could also be set to raspberrypi, or to raspberrypi3 depending on your target hardware (The raspberrypi2 image should also run on an RPI3). The GPU_MEM setting allocates the minimum amount of memory to the GPU leaving the rest for the ARM processor. See the READEME in meta-raspberrypi for details of these and other options.
Secondly edit yocto/poky/build/conf/bblayers.conf and add meta-raspberrypi, mine looks like this
# POKY_BBLAYERS_CONF_VERSION is increased each time build/conf/bblayers.conf # changes incompatibly POKY_BBLAYERS_CONF_VERSION = "2" BBPATH = "${TOPDIR}" BBFILES ?= "" BBLAYERS ?= " /home/david/yocto/poky/meta /home/david/yocto/poky/meta-poky /home/david/yocto/poky/meta-yocto-bsp /home/david/yocto/poky/meta-raspberrypi "
Now it’s time to build, it’s worth noting that the command oe-init-build-env doesn’t just create the configuration files and build directory – it also sets up the environment including the path, so if you build in a new shell, or having logged in you need to re-run oe-init-build-env. It won’t overwrite the changes you’ve made to the configuration. So to build I cd to the poky directory and then
. oe-init-build-env build bitbake rpi-basic-image
The build takes a long time the first time, potentially hours, numerous packages are fetched, when I build the first time I had a package fail to download because the git repository was unavailable, and the build failed. Just re-run the bitbake command. Assuming everything succeeds you should see output that looks like this
Parsing recipes: 100% |#########################################| Time: 00:00:22 Parsing of 891 .bb files complete (0 cached, 891 parsed). 1321 targets, 67 skipped, 0 masked, 0 errors. NOTE: Resolving any missing task queue dependencies Build Configuration: BB_VERSION = "1.30.0" BUILD_SYS = "x86_64-linux" NATIVELSBSTRING = "universal" TARGET_SYS = "arm-poky-linux-gnueabi" MACHINE = "raspberrypi2" DISTRO = "poky" DISTRO_VERSION = "2.1.1" TUNE_FEATURES = "arm armv7ve vfp thumb neon vfpv4 callconvention-hard cortexa7" TARGET_FPU = "hard" meta meta-poky meta-yocto-bsp = "krogoth:f5da2a5913319ad6ac2141438ba1aa17576326ab" meta-raspberrypi = "master:2745399f75d7564fcc586d0365ff73be47849d0e" NOTE: Preparing RunQueue NOTE: Executing SetScene Tasks NOTE: Executing RunQueue Tasks NOTE: Tasks Summary: Attempted 2167 tasks of which 911 didn't need to be rerun and all succeeded.
The resultant sdcard image is found beneath the build directory, flash it to SDCard as you would any other image
tmp/deploy/images/raspberrypi2/rpi-basic-image-raspberrypi2.rpi-sdimg
Testing
Insert the media into your raspberry pi, attach keyboard and monitor, power on…
ssh is also available in this image, access is available as root with no password. Before doing anything else tighten up security.
Have fun…
VPN bridge from home network to AWS VPC with Raspberry Pi
Introduction and disclaimer
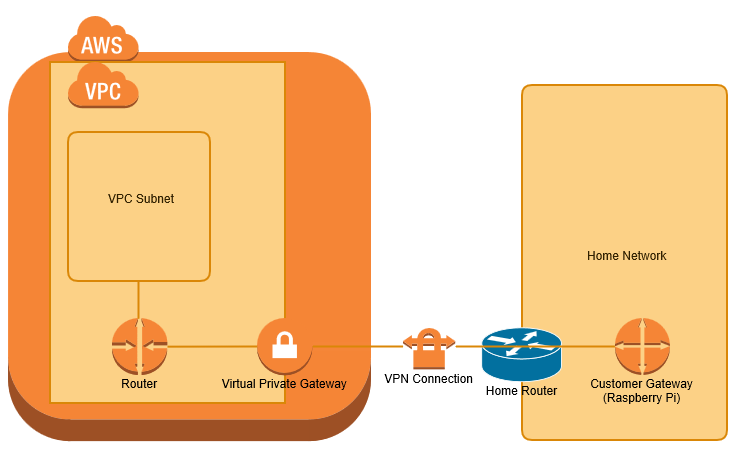
I wanted to extend my home network to a Virtual Private Cloud (VPC) within Amazon Web Services (AWS), primarily for use as a jenkins build farm. I have achieved this using a Raspberry Pi as my Customer Gateway device. This post covers the process of configuring the raspberry pi from scratch and AWS from scratch. I’m posting as a reminder to myself, hopefully others will find this useful.
NOTE: I found this post by Pahud Hsieh on hackmd.io very helpful while developing this. I have also relied heavily on the excellent documentation at http://aws.amazon.com/documentation/
I have a fairly standard home network on 192.168.0/24 with a router provided by my ISP. This post uses a Raspberry Pi, on a static IP address within my home network as a VPN gateway. Allowing any devices on my home network to communicate with EC2 instances (virtual machines), running within my VPC.
Network Diagram
Prerequisite
- Raspberry Pi on a static IP address (in this example 192.168.0.30)
- Home gateway IP address of you home network is static (My ISP doesn’t offer static IP addresses, however the address has not changed for years).
- AWS account (I suggest also running some tutorials, the free tier is sufficient).
I’m starting with a clean install of Raspbian Jessie Lite, although other distributions of Linux should work.
Configuring VPC
Login to AWS, and select Services->VPC, this takes you to the VPC dashboard. Start the VPC Wizard
Choose VPC with a Private Subnet Only and Hardware VPN access and click Select.
Wait for the VPN to be created
Now on the left towards the bottom find the VPN Connections page and click the Download Configuration button at the top of the page
In the downloaded configuration file find the tunnel groups under the IKE section
! ! The tunnel group sets the Pre Shared Key used to authenticate the ! tunnel endpoints. ! tunnel-group <TUNNEL1_IP> type ipsec-l2l tunnel-group <TUNNEL1_IP> ipsec-attributes pre-shared-key <PSKEY_STRING>
You will need the <TUNNEL1_IP> and <PSKEY_STRING> values later, note them down.
Ensure that the static route to your home network exists in the VPN, Opne VPN Connections and select the Static Routes tab, it should show the CIDR for your home network. If not (my setup didn’t) click Edit and type in the CIDR.
Configure the Raspberry Pi
Enable the Random Number Generator
Edit /boot/config.tx and append
# Enable random number generator dtparam=randon=on
Reboot and then install the random number generator tools
sudo apt-get install rng-tools
Install Openswan
sudo apt-get install -y openswan lsof
During package installation you get prompted about using X.509 certificates. I’m sure AWS supports these, for now I’m skipping for simplicity.
IPSec configuration
Edit /etc/ipsec.conf and set the content as shown below. NOTE this is including configuration files from /etc/ipsec.c/*.conf, this allows different files for different connections.
# /etc/ipsec.conf - Openswan IPsec configuration file # # Manual: ipsec.conf.5 # # Please place your own config files in /etc/ipsec.d/ ending in .conf version 2.0 # conforms to second version of ipsec.conf specification # basic configuration config setup # Debug-logging controls: "none" for (almost) none, "all" for lots. # klipsdebug=none # plutodebug="control parsing" # For Red Hat Enterprise Linux and Fedora, leave protostack=netkey protostack=netkey nat_traversal=yes virtual_private= oe=off # Enable this if you see "failed to find any available worker" # nhelpers=0 #You may put your configuration (.conf) file in the "/etc/ipsec.d/" and uncomment this. include /etc/ipsec.d/*.conf
Create a configuration file for this connection, edit /etc/ipsec.d/home_to_aws.conf
conn home-to-aws type=tunnel authby=secret #left=%defaultroute left=192.168.0.30 leftid=123.123.123.123 leftnexthop=%defaultroute leftsubnet=192.168.0.0/24 right=<TUNNEL1_IP> rightsubnet=10.0.0.0/16 pfs=yes auto=start
Where
left – The IP address of your Raspberry Pi on your home network
leftid – The IP address of your home gateway
leftsubnet – the CIDR of your home network
right – the IP address of Tunnel1 in your AWS gateway.
right subnet – The CIDR of your VPC
Input the pre-shared key
edit/var/lib/openswan/ipsec.secrets.inc and set the content as below
123.123.123.123 <TUNNEL1_IP> : PSK "<PSKEY_STRING>"
Edit /etc/sysctl.conf
Append the following lines
net.ipv4.ip_forward=1 net.ipv4.conf.all.accept_redirects = 0 net.ipv4.conf.all.send_redirects = 0 net.ipv4.conf.default.send_redirects = 0 net.ipv4.conf.default.accept_redirects = 0
Then run sysctl -p to reload it.
Check IPSec status
$ sudo ipsec verify Checking your system to see if IPsec got installed and started correctly: Version check and ipsec on-path [OK] Linux Openswan U2.6.38/K4.4.11-v7+ (netkey) Checking for IPsec support in kernel [OK] SAref kernel support [N/A] NETKEY: Testing XFRM related proc values [OK] [OK] [OK] Hardware RNG detected, testing if used properly [OK] Checking that pluto is running [OK] Pluto listening for IKE on udp 500 [OK] Pluto listening for NAT-T on udp 4500 [OK] Checking for 'ip' command [OK] Checking /bin/sh is not /bin/dash [WARNING] Checking for 'iptables' command [OK] Opportunistic Encryption Support [DISABLED]
Restart IPSec
sudo service ipsec restart
Check IPsec status
make sure an active connection is running
$ sudo service ipsec status
● ipsec.service - LSB: Start Openswan IPsec at boot time
Loaded: loaded (/etc/init.d/ipsec)
Active: active (running) since Mon 2016-07-11 17:56:40 UTC; 8min ago
Process: 1660 ExecStop=/etc/init.d/ipsec stop (code=exited, status=0/SUCCESS)
Process: 1746 ExecStart=/etc/init.d/ipsec start (code=exited, status=0/SUCCESS)
CGroup: /system.slice/ipsec.service
├─1840 /bin/sh /usr/lib/ipsec/_plutorun --debug --uniqueids yes --...
├─1841 logger -s -p daemon.error -t ipsec__plutorun
├─1842 /bin/sh /usr/lib/ipsec/_plutorun --debug --uniqueids yes --...
├─1845 /bin/sh /usr/lib/ipsec/_plutoload --wait no --post
├─1846 /usr/lib/ipsec/pluto --nofork --secretsfile /etc/ipsec.secr...
├─1853 pluto helper # 0
├─1854 pluto helper # 1
├─1855 pluto helper # 2
└─1974 _pluto_adns
Jul 11 17:56:41 vpc pluto[1846]: "home-to-aws" #1: STATE_MAIN_I2: sent MI2,...R2
Jul 11 17:56:41 vpc pluto[1846]: "home-to-aws" #1: NAT-Traversal: Result us...ed
Jul 11 17:56:41 vpc pluto[1846]: "home-to-aws" #1: transition from state ST...I3
Jul 11 17:56:41 vpc pluto[1846]: "home-to-aws" #1: STATE_MAIN_I3: sent MI3,...R3
Jul 11 17:56:41 vpc pluto[1846]: "home-to-aws" #1: Main mode peer ID is ID_...4'
Jul 11 17:56:41 vpc pluto[1846]: "home-to-aws" #1: transition from state ST...I4
Jul 11 17:56:41 vpc pluto[1846]: "home-to-aws" #1: STATE_MAIN_I4: ISAKMP SA...8}
Jul 11 17:56:41 vpc pluto[1846]: "home-to-aws" #2: initiating Quick Mode PS...8}
Jul 11 17:56:42 vpc pluto[1846]: "home-to-aws" #2: transition from state ST...I2
Jul 11 17:56:42 vpc pluto[1846]: "home-to-aws" #2: STATE_QUICK_I2: sent QI2...e}
Hint: Some lines were ellipsized, use -l to show in full.
Start on reboot
sudo update-rc.d ipsec defaults
reboot the Raspberry pi and recheck the ipsec service status
Check VPC connection in the VPC console
Make sure Tunnel1 is UP
Redundancy
For increased reliability, add the second tunnel configuration to the RPI configuration
Create an EC2 Instance
To test the configuration Launch an EC2 instance into your VPC. As an example I’m launching the free tier Ubuntu server.
From the EC2 Dashboard select Launch Instance, select Ubuntu Server 14.04 LTS (HVM), SSD Volume Type, select t2.micro (Free Tier Eligible) then click Next: Configure Instance Details. Select your VPC as the Network.
Click Next: Add Storage, Next: Tag Instance, Next: Configure Security Group, Create a new security group and add the rules you require, the example below adds SSH and ICMP (ping) from my home subnet.
Click Review and Launch, Launch, create a new key-pair (or use existing if you prefer), Download the Key Pair and keep them safe. Launch and then View Instance. Wait for the Status Checks to complete.
Note the private IP address – in this example 10.0.1.19
From your Raspberry Pi you should now be able to ping the instance
$ ping 10.0.1.19 PING 10.0.1.19 (10.0.1.19) 56(84) bytes of data. 64 bytes from 10.0.1.19: icmp_seq=1 ttl=64 time=200 ms 64 bytes from 10.0.1.19: icmp_seq=2 ttl=64 time=204 ms
Adding local Routes
Devices on your home network that are to access the VPC need to have a static route added that identifies the Raspberry Pi as the gateway to use for 10.0.0.0/16.
On Linux based devices (including macs)
sudo route -n add 10.0.0.0/16 192.168.0.30
ssh access
copy the key file that you previously downloaded to the machine you want to open an ssh session from. Ensure the pen file has read only permissions.
chmod 400 jenkins_aws.pem
Open an ssh session using the key
ssh -i jenkins_aws.pem ubuntu@10.0.1.19
All being well you are now logged in to your EC2 instance.
Install Raspberry Pi img using OSX
Downloading
cd ~/Downloads
ls -l *.img
this showed
–rwx—— 1 davidcozens staff 4127195136 20 Feb 13:11 2016-02-09-raspbian-jessie.img
Programming the SDCard
diskutil list
The output looked like
diskutil unmountDisk /dev/diskx
zero out the partition table
sudo dd if=/dev/zero of=/dev/rdiskx bs=1024 count=1
Program the SDcard
sudo dd if=2016-02-09-raspbian-jessie.img of=/dev/rdiskx bs=4m
ensure all data is synced
sync
You should now be safe to remove and use the SDCard.
Starting with CODESYS on the Raspberry Pi – Update
Installing CODESYS on Windows 10
Installing CODESYS for Raspberry Pi
Installing the CODESYS Package
Preparing the Raspberry Pi
New Install
Upgrade Raspbian
sudo apt-get updatesudo apt-get dist-upgradesudo rpi-update
Installing CODESYS on the Raspberry Pi
There should be a single message saying the Update has finished
Testing The Installation
Cross development using eclipse and GCC for the RPi
Introduction
When I decided to use eclipse to do some cross development for the Raspberry Pi hosted on windows I was surprised to find that I found lots of useful posts elsewhere that gave a part of the solution, or worked well on a Linux host. I found both of the sites below to be particularly helpful. http://www.gurucoding.com/en/raspberry_pi_eclipse/index.php
http://gnutoolchains.com/raspberry/tutorial/
My blog post Using google test with CDT in eclipse gives details on how to install eclipse CDT, which is an assumed starting point for this post.
Install GCC Cross compiler
Synchronise header file and library versions
Configure eclipse for cross compilation
Configure RPi for gdb
mkdir remote-debugging
gdbserver --version
To automate the use of gdb on the target RPi it needs to have the DataStore server running.
sudo mkdir /opt/rseservercd /opt/rseserversudo tar xf /tmp/rseserver-linux-3.6-M4.tar
sudo su
cd /opt/rseserver
perl ./daemon.pl &
cd /opt/rseserver
perl ./daemon.pl &
When the RPi reboots you should see a message that says
Daemon running on: raspberry, port: 4075
Configure eclipse for Cross debugging
In the project explorer right click on the HelloWorld project and select Debug As->Debug Configurations…, then select C/C++ Remote Application and click the New button (circled).
You should then see your application stopped on the first line and ready to be debugged
Clean error
Further Reading
Unit testing with googletest
Code coverage with Gcov
Static analysis with CppCheck
I develop for RPi by having a unit test project that compiles and runs on my PC for speed, and then a cross compiled project that shares the same source code and runs on the RPi.
Backup and Restore Raspberry Pi to Synology DiskStation
Introduction
References
http://www.beatificabytes.be/wordpress/send-custom-email-notifications-from-scripts-running-on-a-synology/
Solution Overview
Backing Up
Step 1 – root SSH access
sudo passwd root
su root
mkdir ~/.ssh
exit
ls ~/.ssh
If you don’t see a file called id_rsa.pub there you need to generate a pair of keys using this command
ssh-keygen -t rsa -C root@<Your Synology server’s name>
– When prompted for the file in which to save the key, accept the default (hit <Enter>)
– When prompted for a passphrase hit <Enter> (no passphrase)
Now push the public key to the Raspberry Pi (this is why we need the Pi to briefly allow password logins on the root account, because until the public key exists on the destination server, you will be prompted for a password when you run this command):
cat ~/.ssh/id_rsa.pub | ssh root@<your Pi’s IP address> ‘cat >> .ssh/authorized_keys’
Enter the password you created in Step 1 when prompted
Confirm that SSH key logins are now accepted by the Raspberry Pi by running this command (still from the Synology session, don’t toggle back to the Pi session yet🙂
ssh root@<Your Pi’s IP Address>
passwd -d root
Step 2 Creating the backup script files
#!/bin/ash
#This script uses rsync to backup a named Raspberry Pi at a given IP address
#Three rotating backups are kept. If rsync fails then the preceding backups are retained.
if [ “$#” -ne 2 ] ; then
echo “Usage: 2 arguments required: $0 SERVERNAME IP” >&2
exit 1
fi
# Set up string variables
SERVER=$1
ADDRESS=$2
NOW=$(date +”%Y-%m-%d”)
RPI_BACKUP=”/volume1/rpi_backup”
LOGFILE=”$RPI_BACKUP/logs/$SERVER-$NOW.log”
SERVERDIR=”$RPI_BACKUP/$SERVER”
BASENAME=”$SERVERDIR/$SERVER”
# Paths to common commands used
MV=/bin/mv;
RM=/bin/rm;
MKDIR=/bin/mkdir;
PING=/bin/ping;
RSYNC=/usr/syno/bin/rsync
#Function to check for command failure and exit if there has been one. This is done
# so that when invoked from cron the error is reported
check_exit_code() {
exit_code=$?
if [ “$exit_code” -ne “0” ] ; then
echo “$1”
echo “exit with exitcode $exit_code”
exit 1
fi
}
#Ping the RPI a few times to ensure the interface is up (I’ve not seen this fail)
$PING $ADDRESS -c 3 >> $LOGFILE
# Ensure we have a top level backup directory for this server
if ! [ -d $SERVERDIR ] ; then
$MKDIR $SERVERDIR ;
fi ;
# Backups are made to BASENAME.0, this is then moved if the backup was successfull.
# So we start by clearing out anything from a failed backup
if [ -d $BASENAME.0 ] ; then
$RM -rf $BASENAME.0 ;
fi;
# RSYNC via SSH from the RPI as an incremental against the previous backup.
$RSYNC -av
–delete
–exclude-from=$RPI_BACKUP/scripts/rsync-exclude.txt
–link-dest $BASENAME.1
-e “ssh -p 22” root@$ADDRESS:/
$BASENAME.0 >> $LOGFILE 2>&1
# If RSYNC failed in any way, don’t trust the backup, exit the script
check_exit_code “RSYNC Failed”
#Rotate the existing backups
if [ -d $BASENAME.3 ] ; then
$RM -rf $BASENAME.3 ;
fi;
if [ -d $BASENAME.2 ] ; then
$MV $BASENAME.2 $BASENAME.3 ;
fi;
if [ -d $BASENAME.1 ] ; then
$MV $BASENAME.1 $BASENAME.2 ;
fi;
if [ -d $BASENAME.0 ] ; then
$MV $BASENAME.0 $BASENAME.1 ;
fi;
/proc/*
/sys/*
/dev/*
/boot/*
/tmp/*
/run/*
/mnt/*
Step 3 Automating the backup
Step 4 Restoring from backup
Step 5 Backing up a second RPI
sudo passwd root
su root
mkdir ~/.ssh
exit
Push the public key to the Raspberry Pi (this is why we need the Pi to briefly allow password logins on the root account, because until the public key exists on the destination server, you will be prompted for a password when you run this command):
cat ~/.ssh/id_rsa.pub | ssh root@<your Pi’s IP address> ‘cat >> .ssh/authorized_keys’
Enter the password you created in Step 1 when prompted
Confirm that SSH key logins are now accepted by the Raspberry Pi by running this command (still from the Synology session, don’t toggle back to the Pi session yet🙂
ssh root@<Your Pi’s IP Address>
passwd -d root
4) Finally repeat step 3 Automating the Backup for the new host.
ToDo
- There is currently no notification sent if the backup fails. For now I inspect the logs, and the backup does at least preserve the last three good backups. It is possible to use the synology notification system, see http://www.beatificabytes.be/wordpress/send-custom-email-notifications-from-scripts-running-on-a-synology/ I may get around to this, I’m hoping that sinology may improve the system though…
- I want to investigate if I can perform a full system restore on to a blank card. For now I rely on taking occasional card images, and then this automated system gives me backup of all files.
- The timestamp on the individual backup top level directory is incorrect, it gets updated for each backup each time a backup occurs (mv is incorrectly setting the date). I did have a brief look at this, there are a number of obstacles to overcome. mv doesn’t preserve the timestamp on move, I cannot use touch with a specified timestamp because the version available on the DiskStation doesn’t support the feature. I could solve the problem with python, but this isn’t installed as standard. I think I could solve the issue using php, but I haven’t put the time in yet – more important to have a working backup.
Using PiFace Control and Display with CODESYS
This post is intended for CODESYS beginners, it aims to give a step by step guide to creating a CODESYS project for the Raspberry Pi with the PiFace Control and Display add on board. (I am actually using PiFace Control and Display 2, but it appears to be compatible).
Start by creating a new standard CODESYS project.
PiFaceCaD
METHOD Clear
return value: none
METHOD DefineCustomBitmap
Name
|
Type
|
Comment
|
byLocation
|
BYTE (0..7)
|
storage positions of the bitmap (0..7)
|
abyBitmap
|
ARRAY [0..7] OF BYTE
|
bitmap definition: each byte (0 (top)..7 (bottom)) represents on line; each bit (0 (right)..4 (left)) of a byte represents one pixel in the line
|
METHOD Home
return value: none
METHOD MoveLeft
return value: none
METHOD MoveRight
return value: none
METHOD SetCursor
return value: none
Name
|
Type
|
Comment
|
usiColumn
|
USINT
|
column to place the cursor (0..15)
|
usiRow
|
USINT
|
row to place the cursor (0,1)
|
METHOD SetText
return value: none
Name
|
Type
|
Comment
|
sLine1
|
STRING
|
first line
|
sLine2
|
STRING
|
second line
|
METHOD Write
return value: none
Name
|
Type
|
Comment
|
sText
|
STRING
|
string to write
|
METHOD WriteCustomBitmap
return value: none
Name
|
Type
|
Comment
|
byLocation
|
BYTE (0..7)
|
storage positions of the bitmap (0..7)
|
PROPERTY Backlight: BOOL (SET)
PROPERTY Blink: BOOL (SET)
PROPERTY Cursor: BOOL (SET)
PROPERTY Display: BOOL (SET)
SPI
Hello World
Go online and run the application, you should see this
Reading Switches
Configuring a Jenkins Slave to build VS2013 projects
Introduction
I have previously installed Jenkins, SVN and Trac on a single Raspberry Pi 2, with the intention of having a home Continuous Integration server (CI). I now want to get a visual studio 2013 solution built by Jenkins.
As a first project I have decided to get googletest (gtest) to build. As a precursor I have downloaded version 1.7.0 and added it to my local SVN repository, I then copied the msvc directory to msvc2013, open the solution in VS2013, allowed the onetime upgrade to happen, and then committed the new directory. If I build locally gtest builds with a couple of warnings (which is good because we can then check that jenkins sees the warnings).
I have a clean windows 8.1 PC (virtual machine actually) with Visual Studio 2013 Community Edition installed, and the latest version of Java installed (Version 8 update 51).
As a starting point I am following the Step by Step guide to setup master and slave in the Jenkins documentation.
Configuring the Jenkins Master
Save and then click on the newly added node and then click the Launch button.
Adding the required plugins to Jenkins
Configuring the Build
Integrating trac and Jenkins
In this post I cover how I have integrated Trac and Jenkins using HudsonTracPlugin and Jenkins Trac Plugin. I am running both Trac and Jenkins on a Raspberry Pi 2.
Trac Plugin
The Trac Plugin is a plugin for Jenkins that creates links from Jenkins projects to Trac instances.
As an example, if you committed a change with the following log message:
- changeset committed,
- files changed, and
- diff of the changes for each changed file.
Installation involved browsing to Jenkins->Manage Jenkins->Manage Plugins->Available, selecting Available Plugins and then checking the Edgewall Trac Plugin.
The plugin is then configured as part of a build configuration
As simple as that, references to changesets and ticket numbers are now shown as hyperlinks and there is a link from the build page back to trac.
HudsonTracPlugin
The HudsonTracPlugin is a Trac plugin that includes Jenkins build results into the Trac timeline and (optionally) provides a navbar menu to link to the Jenkins instance.
As a newbie I found the documentation for installing this plugin to be somewhat limited. It was actually remarkably easy.
The first step is to install the plugin which is written in python using easy_install, so in a terminal session to the RPi
sudo easy_install https://trac-hacks.org/svn/hudsontracplugin/0.10/
This gave the following output
Downloading https://trac-hacks.org/svn/hudsontracplugin/0.10/
Doing subversion checkout from https://trac-hacks.org/svn/hudsontracplugin/0.10/ to /tmp/easy_install-xAXEIt/0.10
Processing 0.10
Running setup.py -q bdist_egg –dist-dir /tmp/easy_install-xAXEIt/0.10/egg-dist-tmp-vkGSex
unrecognized .svn/entries format; skipping .
unrecognized .svn/entries format in
zip_safe flag not set; analyzing archive contents…
Adding HudsonTrac 0.5-r0 to easy-install.pth file
Installed /usr/local/lib/python2.7/dist-packages/HudsonTrac-0.5_r0-py2.7.egg
Processing dependencies for HudsonTrac==0.5-r0
Finished processing dependencies for HudsonTrac==0.5-r0
I then chose to reboot my RPi, I suspect I could have just restarted apache.
Using a browser I then went to the Trac Admin->Plugins page, HudsonTrac 0.5-r0 was now listed, I enabled it and Applied Changes as shown.
Finally I logged back in to the RPi and edited trac.ini
sudo vi /var/trac/projects/prod/conf/trac.ini
I added the following to the end of the file
[hudson]
alternate_success_icon = true
api_token =
display_build_descriptions = false
display_building = true
display_culprit = false
display_in_new_tab = false
display_modules = false
job_url = http://192.168.0.34:8080/
list_changesets = true
main_page = http://192.168.0.34:8080/
password =
timeline_opt_label = Builds
username =