codesys logo

Developing the CODESYS runtime with TDD

Introduction


I was recently working in the CODESYS runtime again, developing some components for a client and I thought the experience wold make the basis of a good post on bringing legacy code into a test environment, to enable Test Driven Development (TDD)

The CODESYS runtime is a component based system, and for most device manufacturers is delivered as a binary for their target system and a collection of header files and interface definitions. Much of the interface is generic, however there are platform specific headers that abstract the underlying RTOS. Device manufacturers often develop bespoke runtime components, to access proprietary IO for example. To help with this the delivered software package includes template components as a starting point for development. This means that, according to Michael Feathers definition of legacy code (code without tests), the starting point when developing a CODESYS component is legacy code. In this example the starting point was a partially developed component, legacy code.


The Plan

I tend to follow a fairly standard process when bringing legacy code under test. The basic process is well described in TDD How-to: Get your legacy C into a test harness on James Grenning's blog.  I follow roughly the same process, with minor changes, my process can be summarised as follows

  • Select appropriate tools
  • Create a test harness with no reference to the code to be tested and a dummy failing test. Observe it fail. Fix the test and observe it pass.
  • Decide the boundaries of the code I want to test, and include this source in the test harness build.
  • Make the test harness compile (not link)
  • Make the code Link using exploding fakes.
  • Ensure the dummy test still passes
  • Add the first test of the code under test (expect it to crash or fail)
  • Make the test pass by adding initialisation, and using better fakes.
  • Add more tests, always observe them fail (force a failure if needs be - to check that the error output is meaningful), factor out common code into helper functions. Keep the tests small and testing one thing.
  • Add profiling, I like to be able to observe which parts of the code are under test before I make any changes. Particularly if the code under test has large complex functions it is the only way that I trust I have sufficient coverage before making code changes.

Tools

The development build of the component uses a gcc cross compiler on linux. The build is controlled by a makefile and there is already an eclipse project.

I will use the native gcc compiler to run the tests

For the testing framework I'm using googletest 1.8, my preferred test framework for C and C++

To help with creating fakes and mocks I will use Mike Long's Fake Function Framework (fff).

I will add plugins to eclipse so that the whole process can happen in a single environment.


The first test

There are two ways of using googletest, one is to build it as a library and link it to the tests, the other is to fuse the source into a single file, and then include the fused source in the tests. On linux I tend to just build the library with default settings.

I've created a new folder called UnitTests to which I've added a makefile and a single source file with this content

#include "gtest/gtest.h"
namespace
{
TEST(FirstTest, ShouldPass)
{
ASSERT_EQ(1,0);
}
} // namespace

The makefile, references just this source file, the include path has the path to googletest/include. The link line is shown below (I've omitted the paths for simplicity)

g++ FirstTest.o gtest_main.a -lpthread -o UnitTest

This builds, and when run fails as below

screen-shot-2016-09-08-at-11-06-57

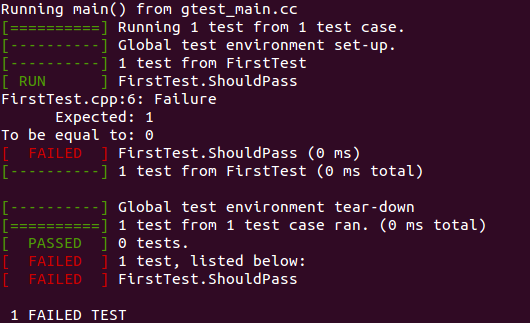
Change the the ASSERT_EQ so that the test passes, rebuild and re-run the tests. 

Compiling with the UUT

The CODESYS component that that I'm working on consists of a single source file (The Unit Under Test UUT), and it links into a target specific library

To get the test application to compile I had to add three directories to the include path

-I$(CODESYS)/Components
-I$(CODESYS)/Platforms/Linux
-I$(TARGET_LIB_SRC)/include

NOTE: If the CODESYS runtime delivery is for a different operating system to the development system then it may be necessary to create fake versions of the headers in the Platforms directory. It may also be necessary to fake some of the RTOS header files.

Linking - Exploding Fakes

Having resolved the includes there are lots of unresolved symbols. A good starting point is to generate a file of exploding fakes, the idea here is to ensure that you know when you are faking code. Have a look at James' exploding fake generator, this can easily be adapted to any linker and any test framework. Save the output of your failed link into a file, execute gen-exploding-fakes-from-linker-output.sh to generate a file of exploding fakes which you include into your build.

make >& make.out
gen-exploding-fakes-from-linker-output.sh make.out explodingfake.c

The only other change required is to copy explodingfakes.h somewhere on the include path for the tests and adapt it to work with gtest as shown.

#ifndef EXPLODING_FAKE_INCLUDED
#define EXPLODING_FAKE_INCLUDED
#include "gtest/gtest.h"
#define EXPLODING_FAKE_FOR(f) void f() { FAIL() << "go write a proper stub for " #f; }
#endif

Now the test application should run and pass again, none of the UUT is yet being executed.


Testing - Part 1

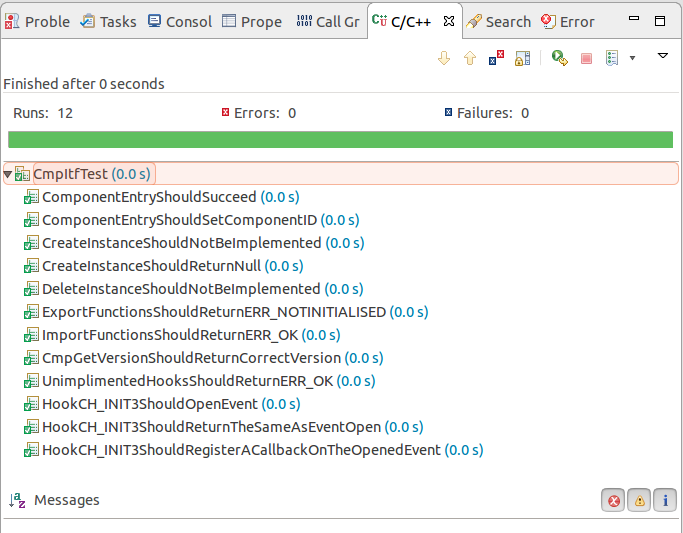
CODESYS components have well defined interfaces, and I find it pays to test from those interfaces rather then exposing internals of the component wherever possible. Taking this approach tends to lead to less fragile tests that are testing the functionality rather than the implementation.

All components implement CmpItf, an interface that allows the component to be registered and initialised. CmpItf requires a single extern function ComponentEntry to be declared, all other functions in the interface are accessed through function pointers returned by this function call. So my starting point is to write tests that test this interface.

The first tests are straight forward, and soon the ComponentEntry call itself is factored out into the test constructor.

#include "gtest/gtest.h"
extern "C"
{
#include "CmpMyComponentDep.h"
DLL_DECL RTS_INT CDECL ComponentEntry(INIT_STRUCT *pInitStruct);
}
namespace
{
class CmpItfTest: public ::testing::Test
{
public:
CmpItfTest():m_rResult(ERR_OK),m_InitStruct()
{
m_rResult = ComponentEntry(&m_InitStruct);
}
RTS_RESULT m_rResult;
INIT_STRUCT m_InitStruct;
};
TEST_F(CmpItfTest, ComponentEntryShouldSucceed)
{
ASSERT_EQ(ERR_OK, m_rResult);
}
TEST_F(CmpItfTest, ComponentEntryShouldSetComponentID)
{
ASSERT_EQ(0x166B2002, m_InitStruct.CmpId);
}
TEST_F(CmpItfTest, CmpGetVersionShouldReturnCorrectVersion)
{
ASSERT_EQ(0x03050800, m_InitStruct.pfGetVersion());
}

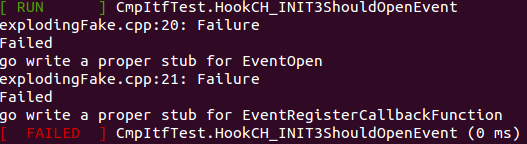
Fairly soon I am testing code that calls into other CODESYS components, as soon as I do, the exploding fakes show up in the tests.

screen-shot-2016-09-11-at-08-53-13


Using The Fake Function Framework

Now I need a more powerful fake, this is where the fake function framework comes in to it's own. Creating a fake for EventOpen can be as simple as adding the following to the test source file, and making sure fff.h is on the include path

#include "fff.h"
#include "CmpEventMgrItf.h"
DEFINE_FFF_GLOBALS;
FAKE_VALUE_FUNC( RTS_HANDLE, EventOpen , EVENTID , CMPID , RTS_RESULT *);

Having added this the link will fail with a message like

CmpEventMgrItf.fff.c:7: multiple definition of `EventOpen'

Remove the line from explodingfakes.c for EventOpen, and the tests should now run again.

It is then possible to write a simple test to prove that the EventOpen function has been called.

TEST_F(CmpItfTest, HookCH_INIT3ShouldOpenEvent)
{
m_InitStruct.pfHookFunction(CH_INIT3,0,0);
ASSERT_EQ(1, EventOpen_fake.call_count);
}

The Fake Function Framework includes facilities for recording a history of argument calls, setting return values and the ability to provide a custom fake. It makes a very powerful tool for testing C code, I'm not going to cover all of the features here there are plenty of other examples on the web. Do note though that fakes need to be reset for each new test. The constructor for my test fixture looks like this

CmpItfTest():m_rResult(ERR_OK),m_InitStruct()
{
m_rResult = ComponentEntry(&m_InitStruct);
RESET_FAKE(EventOpen);
FFF_RESET_HISTORY();
}

As tests grow and there become multiple test files using the same fakes it makes sense to pull the fakes out into separate files,. I follow a pattern, if I am faking functions defined in a file called XXX.h, I create XXX.fff.h and XXX.fff.c and define my fakes in these files. Most of the time I take the approach of generating each fake manually, one by one as required.

CODESYS specifies the interface to all components in .m4 files, in the delivery I have there are 164 interface files specified. I know that over time these interfaces will be extended, and more interfaces added. I have generated a tool to process the interface definitions and automatically generate fff fakes for each API function in each of the interfaces. I then build these fakes into a static library that can be linked with any component I develop.

There is a danger in automating fake generation, it becomes very easy to not realise when you are using a fake. Most API functions in CODESYS return an RTS_RESULT, ERR_OK means success. ERR_OK has the value of zero which is also the default value returned by fff fakes. If developing new code this isn't a problem. But when bringing a legacy component under test it can lead to code appearing to be tested when it isn't. This can be avoided by still using exploding fakes within fff. 

To achieve all of this using the test library all I need in the tests is an include of the appropriate fake header file,

#include "CmpEventMgrItf.fff.h"

and the test constructor is changed to reset all of the CmpEventMgrItf fakes, set all of the fakes to explode, and then for the two functions that I want to fake I can disable the exploding behaviour.

CmpItfTest():m_rResult(ERR_OK),m_InitStruct()
{
m_rResult = ComponentEntry(&m_InitStruct);
FFF_CmpEventMgrItf_FAKES_LIST(RESET_FAKE);
FFF_RESET_HISTORY();
FFF_CmpEventMgrItf_FAKES_LIST(FFF_EXPLODE);
// Allow normal fake operation for these functions, all others in the interface will explode if called.
EventOpen_fake.custom_fake = NULL;
EventRegisterCallbackFunction_fake.custom_fake = NULL;
}


What does the fakes library look like?

To show what is included in the library of fakes, for those who are interested below is the content of the CmpEventMgrItf fakes cut down to show just the two functions that have been used.

CmpEventMgrItf.fff.h

#ifndef __CmpEventMgrItf__FFF_H__
#define __CmpEventMgrItf__FFF_H__
#include "fff.h"
#include <string.h>
#include "fff_explode.h"
#include "CmpEventMgrItf.h"
DECLARE_FAKE_VALUE_FUNC3( RTS_HANDLE, EventOpen , EVENTID , CMPID , RTS_RESULT * );
DECLARE_FAKE_VALUE_FUNC2( RTS_RESULT, EventRegisterCallback , RTS_HANDLE , ICmpEventCallback * );
RTS_HANDLE EventOpen_explode( EVENTID , CMPID , RTS_RESULT * );
RTS_RESULT EventRegisterCallback_explode( RTS_HANDLE , ICmpEventCallback * );
#define FFF_CmpEventMgrItf_FAKES_LIST(FAKE)
FAKE(EventOpen)
FAKE(EventRegisterCallback)

#endif /* __CmpEventMgrItf__FFF_H__ */

Other than including headers three things are happening in this file. Firstly the fff fakes are declared, secondly prototypes for exploding functions are declared and finally a list of all faked functions is created allowing operations to be done on all fakes in one statement.

CmpEventMgrItf.fff.cpp

#include "CmpEventMgrItf.fff.h"
DEFINE_FAKE_VALUE_FUNC3( RTS_HANDLE, EventOpen , EVENTID , CMPID , RTS_RESULT * );
DEFINE_FAKE_VALUE_FUNC2( RTS_RESULT, EventRegisterCallback , RTS_HANDLE , ICmpEventCallback * );
RTS_HANDLE EventOpen_explode( EVENTID  a, CMPID  b, RTS_RESULT * z ){ fff_explode("EventOpen"); return (RTS_HANDLE)0; }
RTS_RESULT EventRegisterCallback_explode( RTS_HANDLE  a, ICmpEventCallback * z ){ fff_explode("EventRegisterCallback"); return (RTS_RESULT)0; }

The fff fakes are defined along with definitions of the exploding fakes. Each exploding fake calls fff_explode, which is declared in a separate module allowing the way it explodes to be changed for a different testing tool..

fff_explode.h

#ifndef __FFF_EXPLODE_H__
#define __FFF_EXPLODE_H__
#define FFF_EXPLODE(a) a##_fake.custom_fake = a##_explode;
#ifdef __cplusplus
extern "C"
{
#endif
void fff_explode(const char * func);
#ifdef __cplusplus
}
#endif
#endif /* __FFF_EXPLODE_H__ */

The macro FFF_EXPLODE(a)  sets the custom_fake variable in an fff fake to point to the exploding fake.

fff_explode.cpp

#include "fff_explode.h"
#include "gtest/gtest.h"
#ifdef __cplusplus
extern "C"
{
#endif
void fff_explode(const char * func)
{
FAIL()<<"Time to use fake for "<<func;
}
#ifdef __cplusplus
}
#endif


Keeping it fast

As I mentioned in the tools section the production code is being built in eclipse. I want to build the test code in eclipse as well, and I want everything to work seamlessly.

I added a second Build Configuration to the production code build, and made this build the unit tests. Having done this I want to run the tests every time I build (Or rather I want to run the tests after every code change, and have the code rebuilt if required). This requires an optional component to be installed in eclipse. Go to Help->Install New Software…, choose to Work with: –All Available Sites– and then under Programming Languages select C/C++ Unit Testing Support, click Next>, Next>, Finish and wait for the install to complete. Restart eclipse when prompted.

Now right click on your project in eclipse and selectRun As->Run Configurations... Create a new C/C++ Unit Test configuration. Use Search Project to find your Unit Test application, then on the C/C++ Testing tab, select Google Tests Runner.

screen-shot-2016-09-08-at-16-14-25

When you run this configuration, it should force your tests to be built and then display the results graphically. Clicking on any failures will take you to the failing tests.

screen-shot-2016-09-10-at-13-20-46

Profiling

Particularly when bringing legacy code under test, I like to be able to visualise what is being tested and what isn't. If you are using gcc then this becomes very easy.

Add these compiler flags to the compilation of the unit under test, and to the link line.

-fprofile-arcs -ftest-coverage

Building and then running with profiling generates .gcda and .gcno files, these are specific to a particular build, so to ensure there are no mismatches in versions add to the link rule in the makefile an action to remove all .gcda and .gcno files from the object directory.

Now having run your tests look in the object directory in eclipse and you will see .gcda and .gcno files, double click one of them. In the dialog that pops up, ensure that your unit test executable is selected, and choose "Show coverage for the whole selected binary".

For me the key is not the amount of code covered, much more, what has been covered by my tests. Each file can be inspected and it is very clear what was run by the tests and what wasn't. This helps me decide if I have sufficient coverage before making changes. For example, the bars below show that my tests don't cover all of the initialisation functions.

screen-shot-2016-09-10-at-13-30-15

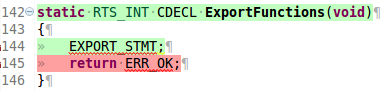
ExportFunctions is a standard function that is part of all components, the implementation shouldn't change. The image below shows that the test suite invokes it, but there must be a return statement inside the EXPORT_STMT. Without code coverage I may never have known that some of the code wasn't being exercised. Inspecting the code will then tell me if I need to add tests or not. This may be a trivial example but I hope it shows why inspecting test coverage helps you understand what is being tested. You can then make informed decisions about increasing the coverage, or accepting that you have gone far enough.

screen-shot-2016-09-10-at-13-30-46

Once I'm happy with the coverage in an area I want to change I can start more traditional TDD development. Having started TDD, I tend not to use code coverage checks very often. Being rigorous about TDD tends to lead to 100% coverage, the main time I re-use the coverage checks is if I have refactored the UUT, it helps to show not just that the existing functionality still passes, but that I haven't inadvertently added some untested functionality.

Summary and next steps

Investing the time to get the component under test has given me a re-useable test harness that allows me to extend and refactor the code with confidence. Future development can happen much faster than it would otherwise, as much of the functionality can be proven before taking the software anywhere near the embedded target.

Some components it is worth investing the time to create pre-canned functionality through custom_fakes. Consider these components

SysMem

With no further work fff can be used to simulate failures, check the sizes being allocated and return fixed data structures on allocations. However in some tests we just want the memory allocation to work, so having a simple set of custom fakes that can be used to delegate these calls functional equivalents is worth while. Another useful extension can be to track allocation and freeing of memory, then in a test fixture setup tracking can be enabled, and in the teardown it can be checked.

CMUtils

This component provides string manipulation and other utility functions, in most cases it is preferable to have a working double than the standard fff fake. If you have a source code distribution of the runtime code I would attempt to link this with the tests.

SysTime and SysTimeRTC

One of the great advantages of Unit Testing in embedded systems is being able to run tests faster than realtime. Develop custom_fakes that allow you to take control of the progress of time. 

Continuous Integration

Tests are only useful when they are run. Setting up a continuous integration system to build and test each component every time there is a change to the source code is the way to go.

Continuous Delivery

How far can you go towards continuous delivery? Using a combination of free tools, and the CODESYS Test Manager I have set up delivery pipelines that build the embedded code, run unit tests, performed static analysis, generated documentation, package up instrument firmware packages, build and test CODESYS libraries, automated version number management, create CODESYS packages, deploy the code into test systems and invoke automated testing (integration and system). If the tests all pass then the packages can be promoted to potential release candidates ready for final human validation as required.


Leave a Reply

Your email address will not be published. Required fields are marked *

Scroll to top